# Installation
# Which version of OfficeLife should you use
OfficeLife comes in two flavors:
as a SaaS, meaning that you need to pay a monthly fee to access the service, on an instance that we host ourselves. We take care of everything, from maintenance to upgrading the instance,
as a software that you can download and install yourself. You will have to maintain this instance yourself. However it’s free, so
¯\_(ツ)_/¯
Below are all the steps you need to follow to install an instance of OfficeLife yourself.
# Requirements for self-hosting
WARNING
This page requires a deep technical knowledge to understand it. If you are unsure on how to install OfficeLife, either ask a developer on your team, or sign up on for an account (opens new window) on an instance that we, the OfficeLife team, offer.
OfficeLife is a Laravel-based application and requires the following technologies to run efficiently.
- PHP 8 or higher,
- a set of extensions:
- BCMath PHP Extension
- Ctype PHP Extension
- Fileinfo PHP Extension
- JSON PHP Extension
- Mbstring PHP Extension
- OpenSSL PHP Extension
- PDO PHP Extension
- Tokenizer PHP Extension
- XML PHP Extension
- MySQL, Mariadb or PostgreSQL
- Apache or Nginx
# Deployment
We recommend Fortrabbit (opens new window) and Platform.sh (opens new window) as PaaS hosts, or Forge (opens new window) and Ploi (opens new window) as IaaS platforms provisioner, to deploy an OfficeLife instance.
You can also use our official Docker image (opens new window) if you prefer.
You can also download a bundle asset from our releases (opens new window) containing all dependencies and build files at once. The assets also contains gnupg signature files, signed off with the key
0x213F85B7B1B8F93224FA85B138C2BAD715449E85. You will find the public key on several keyservers (opens new window), or here.
# Build
If you choose to deploy from the sources, you will have to build the application.
Requirements
- composer
- yarn
Steps
composer installyarn installyarn run production
Then the vendor directory as well as the files created in public folder must be deployed within the application (the node_modules folder can be removed).
# Setup
You should configure your web server’s document / web root to be the public directory. The index.php in this directory serves as the front controller for all HTTP requests entering your application.
Once installed, run this command to setup everything:
php artisan setup
# Directory permissions
You may need to configure some permissions. Directories within the storage and the bootstrap/cache directories should be writable by your web server or OfficeLife will not run.
# Configuration
All configuration are set through the .env file or within environment variables.
The .env.example file contains a list of common configuration you might want to use. These are the main ones:
# Global config
APP_ENV: set toproductionfor a production installationAPP_KEY: this is provisionned by thephp artisan key:generatecommand, or you can manually generate it using this command:echo -n 'base64:'; openssl rand -base64 32APP_DEBUG: this should be set tofalsefor a production installation. If set totrue, this will display all debug traces when an error occurs, so you should never, ever set it totruefor production use.APP_URL: url of the application, used to format the email dispatch
# Database config
DB_CONNECTION: usemysql(mysql or mariadb) orpgsql(postgreSQL)DB_HOST: ip address of the database host, or the container name in a docker environmentDB_PORT: database portDB_DATABASE: database nameDB_USERNAME: database usernameDB_PASSWORD: database password
# Logs and cache
LOG_CHANNEL: Seelogging.php(opens new window) for session.php log channels. For docker container, useerrorlog. On Heroku or fortrabbit, usesyslog.SESSION_DRIVER: set todatabasefor general usage. Seesession.php(opens new window) for available session drivers.- For
redissee section below.
- For
CACHE_DRIVER: A cache system is a good way to speed up your application. Set it todatabasefor general usage. You can also useredis,memcached, ordynamodb. Seecache.php(opens new window) for available drivers.- For
redissee section below.
- For
# Queue connection
WARNING
Setting up a non-sync queue requires you to define a queue worker. See Cron and queue section.
QUEUE_CONNECTION: Setting a queue worker is good way to speed up your application. Set it todatabasefor general usage. Or you can useredis,beanstalkd, orsqs. Seequeue.php(opens new window) for available drivers.- For
redissee section below.
- For
# Redis
If you use redis for cache, session or queue, you’ll have to set these variables too:
REDIS_HOST: ip address of the redis instance, or docker container nameREDIS_PASSWORDandREDIS_PORT
# Mailing
Define your mailing system to use:
MAIL_MAILER: the mailer config to use:smtp,sendmail,mailgun,ses, orpostmark- Set these variable according to your configuration:
MAIL_HOST,MAIL_PORT,MAIL_USERNAME,MAIL_PASSWORD,MAIL_ENCRYPTION MAIL_FROM_ADDRESSandMAIL_FROM_NAMEfor outbound mail information
# Services
LOCATION_IQ_API_KEY: API key for LocationIQ (opens new window) geolocation service. LocationIQ offers 10,000 free requests per day.MAPBOX_API_KEYandMAPBOX_USERNAME: API key for maps displays using Mapbox (opens new window).CURRENCY_LAYER_API_KEYandCURRENCY_LAYER_PLAN(freeorpremium): API key for getting currency exchange rates, using CurrencyLayer (opens new window).UPLOADCARE_PUBLIC_KEYandUPLOADCARE_PRIVATE_KEY: API key for uploading files in Uploadcare (opens new window).
# External login providers
You can add external login providers to OfficeLife.
LOGIN_PROVIDERS: a coma-separated list of enabled login providers. Available providers are:azure,github,google,linkedin,monica,saml2,slack,twitter.
An enabled login provider will be shown on the login page. The order of the list is the order these providers will be displayed.
# Azure Active Directory
Create an new App registration, using the Web redirect URI. The callback url is: https://yourapp.com/auth/azure/callback.
AZURE_CLIENT_ID: the Application (client) IDAZURE_CLIENT_SECRET: a new client secret value you have generated
# GitHub
Go to you Developer settings and create a new OAuth App. The Authorization callback URL is: https://yourapp.com/auth/github/callback.
GITHUB_CLIENT_ID: the client IDGITHUB_CLIENT_SECRET: a new client secret value you have generated
Go to the Google Cloud console, and setup a new project. Create a new OAuth 2.0 client ID, using https://yourapp.com/auth/google/callback as Autorized redirect URI.
The required scopes to add are: .../auth/userinfo.email, .../auth/userinfo.profile and openid.
GOOGLE_CLIENT_ID: the OAuth 2.0 client IDGOOGLE_CLIENT_SECRET: the OAuth 2.0 client secret
# Monica
On the API settings, create a new OAuth client, using https://yourapp.com/auth/monica/callback as Redirect URL.
MONICA_HOST: url of your monica host if different from defaulthttps://app.monicahq.comMONICA_CLIENT_ID: the client IDMONICA_CLIENT_SECRET: the client Secret
On LinkedIn developers portal, create a new app. In Auth setting, setup OAuth 2.0 settings using https://yourapp.com/auth/linkedin/callback as Authorized redicret URL.
LINKEDIN_CLIENT_ID: the client IDLINKEDIN_CLIENT_SECRET: the client Secret
# Saml2
Saml2 is a generic provider standard. The callback UI will be https://yourapp.com/auth/saml2/callback.
You can add a name to your Saml2 application by setting SAML2_NAME.
Once you have setup you saml2 application, you can either
- Set the
SAML2_METADATAto the metadata url - Or set
SAML2_ACS,SAML2_ENTITY_ID,SAML2_CERTIFICATEwith the right values
# Slack
On slack API, create a new app, and setup OAuth & Permissions, using https://yourapp.com/auth/slack/callback as Redirect URLS, and adding these User Token Scopes: identity.avatar, identity.basic, identity.email, identity.team.
SLACK_CLIENT_ID: the client IDSLACK_CLIENT_SECRET: the client Secret
On twitter developer portal, create a new app or project. Activate the 3-legged OAuth authentication, and set https://yourapp.com/auth/twitter/callback as Callback url.
TWITTER_CLIENT_ID: the client IDTWITTER_CLIENT_SECRET: the client Secret
# Cron and queue
OfficeLife is a Laravel-based application, and requires a cron to run, and possibly a queue worker if you can.
# Cron
The cron is a job that run at regular intervals, ideally every minutes.
Setup a cron that run this command:
php artisan schedule:run
See Laravel documentation (opens new window)
# Queue
Setting up a queue is a very good way to improve performances on OfficeLife.
There are 2 steps to follow:
Setup a queue worker (opens new window), using a specific docker container, or tools like supervisor. The command to run is:
php artisan queue:work --sleep=1 --timeout=0 --tries=3 --queue=default,lowDefines
QUEUE_CONNECTIONvariable to use a non-sync queue. See Queue connection section.
# Setup OfficeLife for development purposes
If you want to install OfficeLife locally to support the development, you can follow the instructions on the developer page.
# Installation on Heroku
Officelife can be deployed on Heroku using the button below:

Before deployment, Heroku will ask you to enter a custom APP_KEY when asked (for instance you can use this command to generate the key: echo -n 'base64:'; openssl rand -base64 32).
After deployment, click on the Manage app button to open the dashboard of your new application, as shown below.
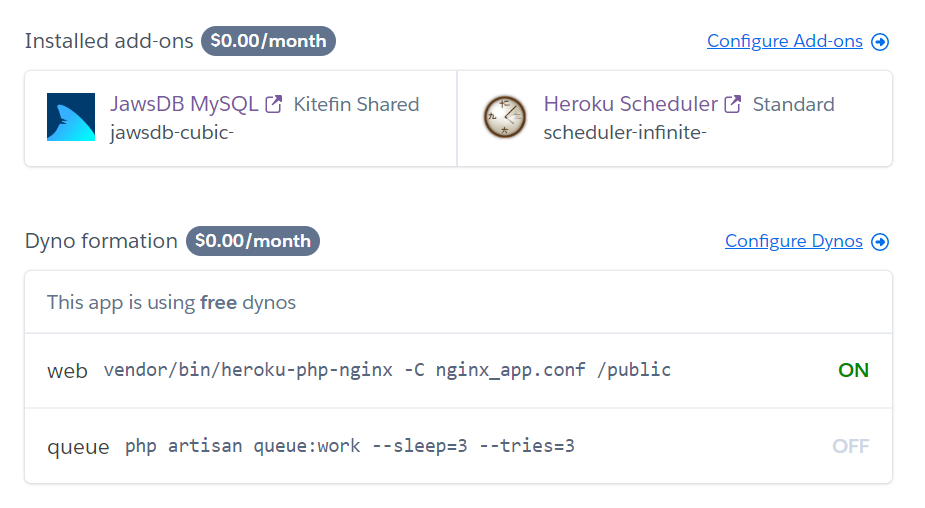
Click on Heroku Scheduler to open the scheduler dashboard. Create a new job, and define a new job to run this command every 10 minutes or every hour at 00 minutes:
php artisan schedule:run
You are now able to open the application and register a new user.
# Populate account with fake data
We provide a way to try out OfficeLife with semi-real data that will give you a good sense of what the tool’s capabilities are. Having an account with a lot of employees and a lot of activities should give you enough of an idea.
We provide a custom command that needs to be executed in the terminal to achieve this.
php artisan setup:dummyaccount
WARNING
Running this command will wipe your database entirely in order to set up a new set of data. Make sure you backup any existing data before running this command.
When you run the command, here is what you should expect to see:
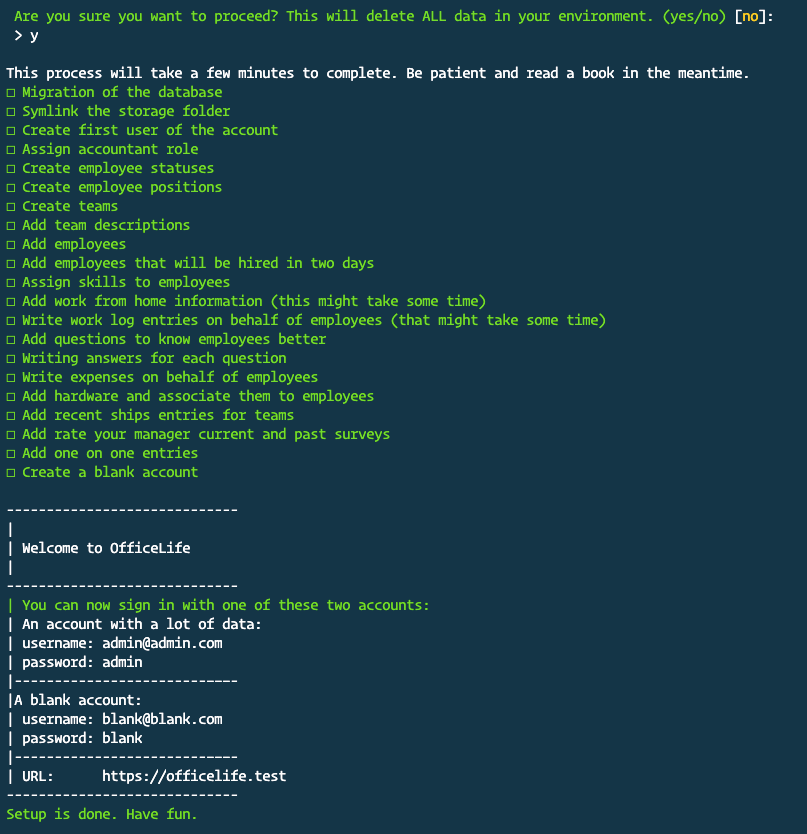
Depending on your database and hardware, it can take up to 5 minutes for the script to run.
Once the script has run, two accounts will be created:
- One of the account will be Michael Scott, administrator of the account and you should be able to sign in to your account by using
admin@admin.comas your email address, andadminas the password. It will contain a lot of data. We are a big fan of the TV show The Office, and as a joke, the fake account mimics what would happen in the fictive company Dunder Mifflin. - The second account will be an empty account, so you can see the blank state. You need to sign in with
blank@blank.comand the passwordblank.